Friday, December 21, 2012

Frosty & Rudolph Donuts

It's almost Christmas!!!  We are getting so excited around here!  

I had to post these adorable donuts that I had the kids in my daughter's class make for their Christmas party.  They were so simple and so stinkin' cute!  We've been making LOTS more today to give away as neighbor gifts.

These might even be fun to make for Santa.  I'm sure he'd enjoy them!

Thanks to wonderful Nikki from Chef In Training for posting these and lots of other super fun Christmas goodie ideas.


I hope you all have a fantastic Christmas!!

Wednesday, December 5, 2012

The Highlight of My Kitchen...A Bosch Mixer

It's been almost a month since I've posted last!  Have you missed me?  Well, I've missed you.

I had surgery almost 4 weeks ago (tonsils and adenoids removed and a deviated septum fixed) and I had no idea how tough recovery would be!  PHEW!!!  It was rough!

But I'm happy to report that I'm almost back to my normal self again.  YAY!!

Though, I've suffered a very unfortunate side effect from my surgery.  Almost everything I eat that is sweet tastes HORRIBLE!  Has that happened to anyone else?  My sense of taste has been drastically altered, and as a food blogger, that's absolutely devastating.

Thankfully, my taste has been returning, but more slowly than I want.  I should just be grateful that it's returning at all.  So, while I'm not trying new recipes right now, I wanted to address a question I've received about my stand mixer.

An anonymous person asked me what kind of mixer I have pictured in my Banana Chocolate Chip Cookies post.

This is what I have...a Bosch Universal Mixer.  It is by far the most used item and highlight of my kitchen.

My wonderful mother-in-law gave this to me for Christmas several years ago and it is an absolute treasure!

They have since remodeled the Bosch and the new ones look like this...


Here are a couple of links for you to check out that compare a Bosch and a Kitchenaid:

http://www.everythingkitchens.com/boschvskitchenaid.html
http://www.everythingkitchens.com/bosch-video-index-main.html

When it comes to making bread, there is absolutely NO comparison!  The Bosch is so far more superior to any Kitchenaid.  The way a Bosch kneads bread dough allows the dough to only rise once, after it is formed into loaves.

A Kitchenaid or any other stand mixer, however, requires that dough must rise before it is formed into loaves and again after it is formed into loaves.

That right there saves you about an hour.  Awesome!

I use my Bosch to make so many things...cakes, bread, cookies, cheesecake, mashed potatoes, quick breads, shredded chicken, pie filling, and on and on and on.

It makes cooking and baking such a breeze!

Here are some of my favorite ways to use my Bosch...

Potato Bread
Breadsticks
Chocolate Chip Cookies
Cinnamon Rolls
Fudge Cookies
Pumpkin Chocolate Chip Cookies
Soft Pretzels
Whole Wheat Bread
Multi-Grain Bread
Chocolate Chip Banana Bread
Snickerdoodles
Chewies
Chocolate, Chocolate Chip Cookies
Caramel Toffee Brownies
Dark Chocolate Cookie Sheet Brownies

Monday, November 12, 2012

Crockpot BBQ Chicken

I love my crockpots.  Yes, I said crockpots...as in plural.  I have four and, yes, I do need each one.

It's a wonderful thing to fill it with ingredients, turn it on and several hours later, you have a delicious meal that's waiting to be eaten.  It's like magic, really.

Today's recipe comes from an adapted Pinterest find.  It's super simple and quite delicious.  My kids loved that the chicken was so tender that they could cut their own chicken with their forks.


Here's what you'll need:

4-6 chicken breasts (I used 4 and cut each one in half to get 8 pieces)
1 (18 oz.) bottle BBQ sauce
1/4 C. white vinegar
1/2 tsp. red pepper flakes (optional, it's if you like some kick)
1/4 C. brown sugar
1 tsp. garlic powder

Place the chicken breasts in the crockpot.  Season with whatever seasonings you like.  I went with Sweet Mesquite seasoning.


In a small bowl, combine the BBQ sauce, vinegar, red pepper flakes (if desired), brown sugar, and garlic powder.


Pour over the seasoned chicken.


Turn the crockpot on Low and cook for 4 hours.  


After the 4 hours, I took the lid off and let it cook for another 30 minutes to thicken the sauce on the chicken a bit.


 Serve with rice or mashed potatoes.


Monday, November 5, 2012

Ham Rolls with Apricot-Pineapple Sauce

I tried a new recipe from the cookbook that my sister, Lynae, put together and gave me.  It was quite good! And it was so easy to assemble and didn't take long to get to the table.  SWEET!!

I think this would make a great dish to serve while entertaining.  Just a thought.


Here's what you'll need:

Thick sliced ham lunch meat (I used a whole 1lb. package which had 16 slices in it)
Sliced Swiss cheese (one slice per slice of ham, so I needed 16 slices of cheese)
1 box Stove Top Stuffing

Apricot-Pineapple Sauce:
1 Tbsp. cornstarch
2 Tbsp. brown sugar
1 C. water
1 C. pineapple juice
1/4 C. apricot-pineapple preserves
1 Tbsp. butter

Prepare stuffing mix as directed on the box.  Set aside.  On a plate, lay out a slice of ham, top with a slice of cheese.


Then place approximately 1/3 cup of prepared stuffing on the cheese.  


Roll and secure with a toothpick and place on a shallow baking dish.


In a small saucepan, stir together the cornstarch and brown sugar.  Add the water and pineapple juice.  


Stir over medium heat until the mixtures comes to a full rolling boil.  Let boil for 2 minutes.  


Remove from the heat and stir in the butter and preserves.


 Pour over the ham rolls.


Bake at 350 degrees for 15-20 minutes.


Serve hot with the sauce spooned over top.


Tuesday, October 30, 2012

Halloween Party

We co-hosted a Halloween party over the weekend.  It was so much fun!  So today, I wanted to post some pictures of it to help give some last minute inspiration for those who may be needing it.

 My friend, Audra, cut out LOTS of bats with a die-cut machine that flocked our dining room.

 We had everyone bring a Halloween treat.  Just look at all of the fun ideas!!

 For a simple photo backdrop, we used streamers and a BANNER.  So simple!

 I found this Halloween BOO MIX  here that has monster scabs (Golden Grahams or Cinnamon Toast Crunch), Ghost Poop (mini marshmallows), Witch Warts (chocolate chips), and Goblin Teeth (candy corn).  How fun is that?!

I used free Halloween printables found HERE, HERE, HERE, HERE, and HERE.
And lots of other ideas HERE.


This was my favorite costume from our party.  It makes me laugh every time I look at it!

Have a happy and safe Halloween, everyone!!

Monday, October 22, 2012

Caramel Toffee Brownies

My friend, Reegen, is such a doll!  She's one of the most sweet and genuine people that I know.  Back in August, she gave me this recipe and told me how good it was.  I've adapted it from Six Sisters' Stuff.

I decided to try this out on all of the workers my in-laws had during potato harvest.  (We kept some for us too, of course.)  From what I heard, it was a smashing hit!


But, seriously, how can you go wrong with chocolate, caramel, toffee, and more chocolate?  It's almost guaranteed to be a home run dessert!


What you won't believe is that this dessert is made from a cake mix and that it's pretty simple to make.

I have to apologize for the lack of pictures of the process, but it's just mostly a matter of making layers.  Nothing tricky.  But I did get LOTS of pictures of the finished product.  They looked SO. AMAZING.  And they tasted OUT. OF. THIS. WORLD.


So, thank you, Reegen for introducing me to these incredible brownies.  We love them almost as much as we love you!


Here's what you'll need:

1 pkg. chocolate cake mix
1 (5 oz.) can evaporated milk (a tiny can)
1 (14 oz.) bag caramels (42 caramels)
3/4 C. melted butter
1 (12 oz.) bag milk chocolate chips
1 (8 oz.) bag toffee bits

Mix together the cake mix, melted butter, and 1/3 cup evaporated milk.  Press 1/2 of the mixture into a greased 9 x 13-inch pan and set aside the other 1/2 of the brownie mixture.  Bake at 350 degrees for 6 minutes.  Remove brownies from the oven and sprinkle on half of the toffee bits.  Melt together the caramels and the rest of the evaporated milk.  (I melted mine in the microwave until the mixture was smooth.)  Pour the caramel over the toffee bits.  Sprinkle half of the chocolate chips on top of the caramel.  Crumble the rest of the brownie mixture over the chocolate chips, then top with the remaining toffee bits and chocolate chips.  Bake at 350 degrees for 20-25 minutes.  Refrigerate for 3 hours before serving.


Try this out soon and enjoy these mouth-watering pictures...


Tuesday, October 16, 2012

Crockpot Chicken & Dumplings

Fall is in full swing around here!  Today is cold, rainy, and super WINDY!  We're supposed to see wind speeds over 50 MPH.  That's a little nuts, isn't it?

What better thing to do on a day like this than make some nice, warm comfort food.  And since this meal cooks in the crockpot, that means your oven is free to bake some bread or goodies.  Doesn't that sound nice?  It sure does to me!

This recipe is adapted from HERE and we absolutely LOVED it!  I loved the shortcut of using canned biscuit dough for the dumplings.  It was so simple and so delicious!  Brilliant really.


Here's what you'll need:

2 boneless, skinless chicken breasts (I doubled the recipe since we were cooking for extras and I only had three chicken breasts.  It worked out great though.)
2 Tbsp. butter
2  (10.5 oz.) cans cream of chicken soup
1 (14.5 oz) can chicken broth
1/2 onion, diced OR you can use 2 Tbsp. dried, diced onion
1 Tbsp. dried parsley
4 Grands flaky refrigerator biscuits

Place chicken in crockpot.  Plop the butter on the chicken.


Then scoop the cream of chicken soup on that (since I doubled this recipe, I only had 3 cans of cream of chicken soup, so I added a can of cream of mushroom soup).


Pour the chicken broth over all.


Add the diced onion and dried parsley.


Cover and cook on High for 4-5 hours or Low for 8-9 hours.
After the chicken is cooked, shred it and put it back into the soup.


Cut each biscuit into 9 pieces.
(Remember that I doubled mine, that's why there are more than 4.)


Stir gently into the soup.  Cover and turn the crockpot to High and cook for another hour.


After an hour, stir it up and this is what you'll get.


Serve warm and enjoy!


Saturday, September 15, 2012

Chocoflan

There's not a whole lot that I know about Mexico.  Well, except for the fact that I LOVE to vacation there.  And that I LOVE Latin music.  And that Latin dancing is my FAVORITE.  Oh, and there's the food.

Oh, the food.

I really can't get enough of Mexican food.  I love, love, LOVE it!!

But there are so many Mexican specialties that I have yet to try.

When we had our baby, my brother's roommate's fiance, Paulina (did you follow that?), made us the most incredible cake.  I had no idea what it was, but it looked amazing!


When my brother came over to visit, I showed it to him.  His eyes lit up and he told me it was called "Chocoflan."  He proceeded to tell me what an incredible cake it was and that it's very popular in Mexico, where he had been living for almost two years.

When we tried it, I just about died!  It was SO INCREDIBLY GOOD!!!!  It has caramel studded flan on top and a moist chocolate cake on the bottom.

Amazing.  Absolutely amazing.

As the kids were eating their slices, I asked them how they liked it.  My two-year-old stood up on his barstool and yelled at the top of his lungs, "I LOVE IT!!!"

It was a big hit at our house, to say the least.

I asked Paulina if she could teach me how to make it.  She so kindly came over and walked me through it, and I was so surprised at how EASY it was to make!

So, now I will walk you through it.  And I'm sure you'll be just as shocked at how simple it is to make such an amazing, authentic Mexican dessert.

Here's what you'll need:

1/2 C. cajeta or dulce de leche
1 C. sugar
1 (12 oz.) can evaporated milk
1 (8 oz.) pkg. cream cheese, softened
4 eggs
1 tsp. vanilla

1 chocolate cake mix (made as directed on the box)
1/2 C. sour cream

Spray a bundt pan very well with non-stick spray.  In the bottom of the bundt pan, pour your cajeta or dulce de leche in a random, sporadic way.  Like this...


There is no cajeta in our small town, so Paulina recommended this kind of dulce de leche.

When I looked closely at the bottle, it shows that you can use this on pancakes.  We are so going to try that!


In a bowl, beat the sugar, evaporated milk, cream cheese, 4 eggs, and vanilla.  I've also read that you can do this step in a blender if you would rather have a more smooth texture to the flan.

Set aside.


In another bowl, make the chocolate cake mix according to the package instructions, adding 1/2 cup of sour cream.


Get ready to fill your bundt pan.


Pour your chocolate cake batter into your bundt pan, on top of the cajeta or dulce de leche.


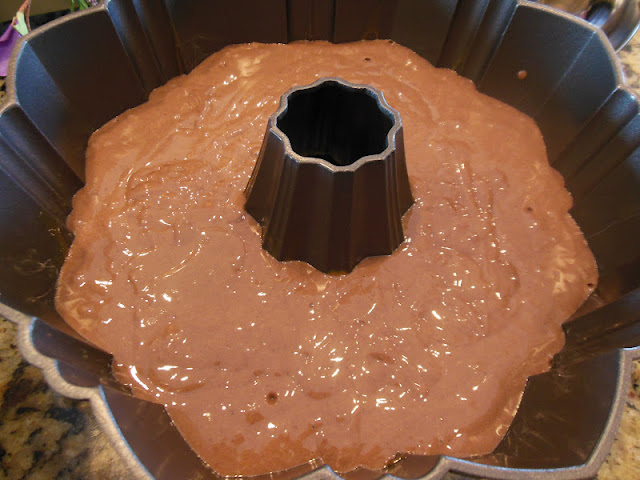
Using a ladle, gently ladle the flan mixture on top of the chocolate cake mixture.


Spray a piece of foil with non-stick spray and cover your bundt pan with the foil, sprayed side down.


Place the bundt pan in a larger roasting pan.  Fill the pan with water until it comes almost 1/2 way up the sides of the bundt pan.

This is called a water bath.


Bake at 350 degrees for 1 1/2 hours or until a toothpick inserted into the cake comes out clean.


Chocoflan is also called "The Impossible Cake" because it does the impossible while baking.  The flan and the chocolate cake switch places.  It's so cool!

Cool in the pan on a cooling rack until it's cool enough to put in the fridge.  Then cover with plastic wrap and refrigerate it for at least two hours, but preferably overnight.


After it has fully chilled, invert onto a plate or serving platter.
And this is what it looks like...


So, so, so, SO incredible!!!
Thank you, Paulina, for teaching me!
Related Posts Plugin for WordPress, Blogger...