Monday, January 28, 2013

Oatmeal Bread

Have you ever been asked what your favorite childhood smell was?  I have, and I have two answers for that. 

1.  I loved the smell of the wild honeysuckles that grew in the back of our property when we lived in Georgia.  
2. The smell of freshly baked homemade bread that could stop you in your tracks as you walk in the house, coming home from school in California.

Honeysuckles and homemade bread.  For me, those are two of the best aromas ever.

Today's recipe is my latest favorite bread to make.  It looks and tastes like regular white bread, but it has the added nutrients of healthy oatmeal.


Here's what you'll need:

4 C. warm water
1 Tbsp. yeast (I like to use SAF instant yeast)
2/3 C. sugar
1/3 C. oil
1 individual packet REGULAR instant oatmeal (not the flavored kind), cooked to package directions OR 1 serving of unflavored oatmeal, cooked to package directions

12 1/2 C. flour
3/4 C. dry powdered milk
1 Tbsp. salt

Cook the one serving of unflavored oatmeal, as directed on the package and set aside.  In a Bosch or other stand mixer, combine the warm water, yeast, sugar, oil, and oatmeal.  Mix with a dough hook on Low speed just until combined (for about 10 seconds).


Then add the flour, powdered milk, and salt.


Knead on High for 10 minutes. 


Just GORGEOUS!


If you are using a Bosch mixer, you can immediately divide the dough into four loaves.

If you are NOT using a Bosch mixer, place the dough into a lightly greased bowl and cover and let rise until doubled.  Then divide into four loaves.


Cover the loaves with a towel and allow to rise for about an hour... 


or until they look about like this...


Bake at 350 degrees for 35 minutes.  


Then you'll get this.


Remove from the pans and cool on a cooling rack.


Hello, beautiful! 


 So delicious!


I wonder if my kids will have the same association to freshly baked bread as I do.  I guess time will tell.

Friday, January 25, 2013

Beef Empañadas

On the weekends, the kids and I like to celebrate no school by making super yummy dinners.  These dinners usually take more time to make, but they are extra delicious and fun for the kids to eat.  This recipe is one of the kids' favorites!  It comes from my sister, Lynae's, cookbook and they are so super good!


Here's what you'll need:

Dough:
4 C. flour
1 Tbsp. baking powder
1 tsp. salt
1/2 C. butter
1 egg, whisked
1 C. water

Filling:
1 lb. ground beef
1 can tomato sauce
1 Tbsp. dried chopped onion OR 1/2 an onion, finely chopped
1 C. salsa
1/2 tsp. chili powder
1 Tbsp. sugar
Salt & Pepper, to taste

Cook the ground beef then add the remaining filling ingredients and allow to simmer.


To make the dough, combine the flour, baking powder, and salt.  I used my food processor, but that's not necessary.   Cut the butter into the flour.


Add the whisked egg and slowly add the water until it becomes doughy, much like pie crust dough.


Roll flat and cut into circles.


We used a bowl to cut our circles.


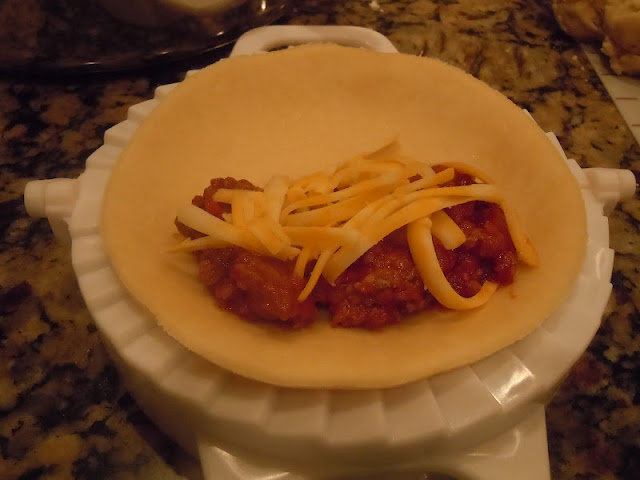
I have this mold that we use, but just folding the dough over and crimping it shut with a fork, or pinching it, works just as well.


Spoon some filling (about 1/4 - 1/2 cup, depending on the size of your circle) on one side of the dough.


Sprinkle with some grated cheese.


Fold the dough over and pinch the seams closed.


Repeat with the remaining dough and filling.


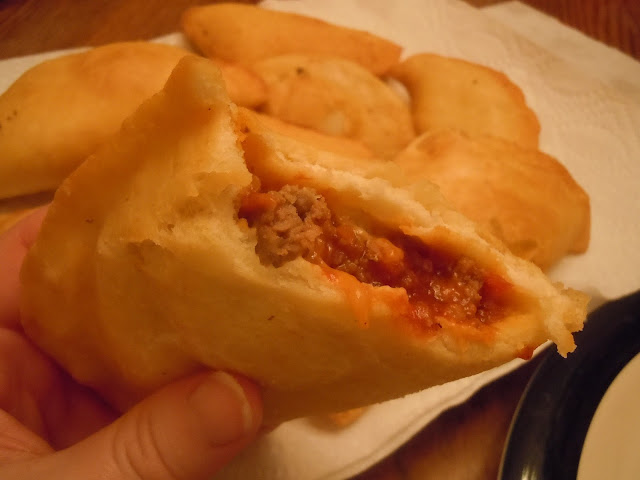
Fry in oil until golden brown.


Place on a paper towel-lined plate.  Serve warm.


There are so many ways you could change these up.  Try a filling with pizza sauce, Italian sausage, olives, and Mozzarella cheese.

Make little dessert Empañadas by using pie filling instead of a meat filling.  Once they've fried, drizzle them with a powdered sugar glaze.

YUMM-O!!!  I hope you enjoy these too!

Friday, December 21, 2012

Frosty & Rudolph Donuts

It's almost Christmas!!!  We are getting so excited around here!  

I had to post these adorable donuts that I had the kids in my daughter's class make for their Christmas party.  They were so simple and so stinkin' cute!  We've been making LOTS more today to give away as neighbor gifts.

These might even be fun to make for Santa.  I'm sure he'd enjoy them!

Thanks to wonderful Nikki from Chef In Training for posting these and lots of other super fun Christmas goodie ideas.


I hope you all have a fantastic Christmas!!

Wednesday, December 5, 2012

The Highlight of My Kitchen...A Bosch Mixer

It's been almost a month since I've posted last!  Have you missed me?  Well, I've missed you.

I had surgery almost 4 weeks ago (tonsils and adenoids removed and a deviated septum fixed) and I had no idea how tough recovery would be!  PHEW!!!  It was rough!

But I'm happy to report that I'm almost back to my normal self again.  YAY!!

Though, I've suffered a very unfortunate side effect from my surgery.  Almost everything I eat that is sweet tastes HORRIBLE!  Has that happened to anyone else?  My sense of taste has been drastically altered, and as a food blogger, that's absolutely devastating.

Thankfully, my taste has been returning, but more slowly than I want.  I should just be grateful that it's returning at all.  So, while I'm not trying new recipes right now, I wanted to address a question I've received about my stand mixer.

An anonymous person asked me what kind of mixer I have pictured in my Banana Chocolate Chip Cookies post.

This is what I have...a Bosch Universal Mixer.  It is by far the most used item and highlight of my kitchen.

My wonderful mother-in-law gave this to me for Christmas several years ago and it is an absolute treasure!

They have since remodeled the Bosch and the new ones look like this...


Here are a couple of links for you to check out that compare a Bosch and a Kitchenaid:

http://www.everythingkitchens.com/boschvskitchenaid.html
http://www.everythingkitchens.com/bosch-video-index-main.html

When it comes to making bread, there is absolutely NO comparison!  The Bosch is so far more superior to any Kitchenaid.  The way a Bosch kneads bread dough allows the dough to only rise once, after it is formed into loaves.

A Kitchenaid or any other stand mixer, however, requires that dough must rise before it is formed into loaves and again after it is formed into loaves.

That right there saves you about an hour.  Awesome!

I use my Bosch to make so many things...cakes, bread, cookies, cheesecake, mashed potatoes, quick breads, shredded chicken, pie filling, and on and on and on.

It makes cooking and baking such a breeze!

Here are some of my favorite ways to use my Bosch...

Potato Bread
Breadsticks
Chocolate Chip Cookies
Cinnamon Rolls
Fudge Cookies
Pumpkin Chocolate Chip Cookies
Soft Pretzels
Whole Wheat Bread
Multi-Grain Bread
Chocolate Chip Banana Bread
Snickerdoodles
Chewies
Chocolate, Chocolate Chip Cookies
Caramel Toffee Brownies
Dark Chocolate Cookie Sheet Brownies

Monday, November 12, 2012

Crockpot BBQ Chicken

I love my crockpots.  Yes, I said crockpots...as in plural.  I have four and, yes, I do need each one.

It's a wonderful thing to fill it with ingredients, turn it on and several hours later, you have a delicious meal that's waiting to be eaten.  It's like magic, really.

Today's recipe comes from an adapted Pinterest find.  It's super simple and quite delicious.  My kids loved that the chicken was so tender that they could cut their own chicken with their forks.


Here's what you'll need:

4-6 chicken breasts (I used 4 and cut each one in half to get 8 pieces)
1 (18 oz.) bottle BBQ sauce
1/4 C. white vinegar
1/2 tsp. red pepper flakes (optional, it's if you like some kick)
1/4 C. brown sugar
1 tsp. garlic powder

Place the chicken breasts in the crockpot.  Season with whatever seasonings you like.  I went with Sweet Mesquite seasoning.


In a small bowl, combine the BBQ sauce, vinegar, red pepper flakes (if desired), brown sugar, and garlic powder.


Pour over the seasoned chicken.


Turn the crockpot on Low and cook for 4 hours.  


After the 4 hours, I took the lid off and let it cook for another 30 minutes to thicken the sauce on the chicken a bit.


 Serve with rice or mashed potatoes.


Monday, November 5, 2012

Ham Rolls with Apricot-Pineapple Sauce

I tried a new recipe from the cookbook that my sister, Lynae, put together and gave me.  It was quite good! And it was so easy to assemble and didn't take long to get to the table.  SWEET!!

I think this would make a great dish to serve while entertaining.  Just a thought.


Here's what you'll need:

Thick sliced ham lunch meat (I used a whole 1lb. package which had 16 slices in it)
Sliced Swiss cheese (one slice per slice of ham, so I needed 16 slices of cheese)
1 box Stove Top Stuffing

Apricot-Pineapple Sauce:
1 Tbsp. cornstarch
2 Tbsp. brown sugar
1 C. water
1 C. pineapple juice
1/4 C. apricot-pineapple preserves
1 Tbsp. butter

Prepare stuffing mix as directed on the box.  Set aside.  On a plate, lay out a slice of ham, top with a slice of cheese.


Then place approximately 1/3 cup of prepared stuffing on the cheese.  


Roll and secure with a toothpick and place on a shallow baking dish.


In a small saucepan, stir together the cornstarch and brown sugar.  Add the water and pineapple juice.  


Stir over medium heat until the mixtures comes to a full rolling boil.  Let boil for 2 minutes.  


Remove from the heat and stir in the butter and preserves.


 Pour over the ham rolls.


Bake at 350 degrees for 15-20 minutes.


Serve hot with the sauce spooned over top.


Related Posts Plugin for WordPress, Blogger...