Friday, August 27, 2010
Just so you know...
My computer crashed. It sounds like I've lost everything I had on there - pictures of recipes and all. I'm currently using our dinosaur of a computer that is so incredibly slow. So, I won't be posting any new recipes until we get our computer fixed or replaced. Until then, enjoy the recipes that are already on here! Hopefully I'll be back soon!!
Saturday, August 21, 2010
New Things
Over the summer I've been thinking about some changes I'd like to make with this food blog. And, now, with my sister-in-law's help, I'm making them! One big change - I now have a button!! I'm so excited about it! So, please feel free to add a button to your own blog. If you have questions, let me know and I'll try to help you out.
Thanks!!
Hannah
Thanks!!
Hannah
Friday, August 20, 2010
Fresh-Squeezed Lemonade
Before summer is over, I wanted to post this recipe I tried for lemonade. It was DELICIOUS!!! We made it for Father's Day for my hubby and my father-in-law. I'm not sure what my father-in-law thought of it, but we LOVED it!!
Here's what you'll need:
2 C. sugar
1 C. water
2 C. fresh lemon juice
1 gallon cold water
1 lemon, sliced (0pt.)
In a small saucepan, combine the sugar and the 1 cup water. Bring to a boil and stir to dissolve sugar. This is called a simple syrup.
 Allow to cool and refrigerate until chilled. When you're ready to juice your lemons, roll them against the counter with your hand pressed on top to get the most juice out of your lemons. I happen to be using a lime in this picture since we were making both Lemonade and Limeade.
 We made the syrup and juiced our lemons the night before and let them chill in the fridge overnight, along with our gallon of water. Then when you're ready to serve it, combine the syrup, the lemon juice, and the gallon of water.


Here's what you'll need:
2 C. sugar
1 C. water
2 C. fresh lemon juice
1 gallon cold water
1 lemon, sliced (0pt.)
In a small saucepan, combine the sugar and the 1 cup water. Bring to a boil and stir to dissolve sugar. This is called a simple syrup.
Allow to cool and refrigerate until chilled. When you're ready to juice your lemons, roll them against the counter with your hand pressed on top to get the most juice out of your lemons. I happen to be using a lime in this picture since we were making both Lemonade and Limeade. We made the syrup and juiced our lemons the night before and let them chill in the fridge overnight, along with our gallon of water. Then when you're ready to serve it, combine the syrup, the lemon juice, and the gallon of water.Serve cold in nice tall glasses with a wedge of lemon, if desired.

Sip it nice and slow and enjoy what's remaining of the last summer days.
Wednesday, August 18, 2010
Homemade Raspberry Jam
I'm new at this. I've never made jam before - like REAL jam. Not that super easy and not very good freezer jam. I rarely will even eat that. I mean the real deal raspberry jam, cooked and canned, and soooooooooooooooooooooooooooo delicious!!!
So, I was a little nervous to say the least. I don't do a lot of canning, nor do I know a lot about it. As I was preparing to make this, I was wishing my mother-in-law was right next to me to help me through it. She's a PRO at canning. I'm a total rookie.
But it worked out! Yay!! I took some pictures to walk you through the basic steps of making jam. Now, one thing you should know is that depending on what pectin you purchase, the recipes vary. FOLLOW THE RECIPES THEY GIVE YOU INSIDE THE PACKAGE. Since the recipes are different, I'll just walk you through how to do it - no recipe included.
Here's what you do:
Bring a boiling-water canner, a little more than half full with water, to a simmer.
Wash jars and screw bands in hot, soapy water; rinse with warm water. Let stand in hot water until ready to use. I keep the flat lids in the hot water as well. Drain well and dry off just before filling.
Prepare fruit as directed. Whatever you do, do not puree the fruit! You want the jam to have fruit bits. So, crush with a potato masher or pulse in a food processor.

Measure exact amount of sugar in a separate bowl and set aside.
Measure exact amount of prepared fruit into a 6 or 8 quart saucepan. Stir in pectin and a 1/2 teaspoon of margarine or butter to reduce the foaming. Bring mixture to a full rolling boil (it doesn't stop bubbling when stirred) on high heat; stirring constantly.

Stir in the sugar quickly, all at once. Return to a full rolling boil and boil for exactly 4 minutes; stirring constantly.


Remove from heat and skim off foam with a metal spoon.
Remove approximately 3/4 of the seeds then ladle into prepared jars, filling to within 1/8 inch of tops. Wipe jar rims and threads clean. Cover with lids and screw band tightly.


 Place jars on elevated rack in canner. Lower rack into canner. Water must cover jars by 1-2 inches; add boiling water if needed.
  Cover; bring water to a gentle boil. Process jams according to instructions. Make any adjustments for your altitude if needed.

Remove jars and place upright on a towel to cool completely. After jars cool, check seals by pressing middle of lid with finger. If the lid springs back, it is not sealed and will need to be refrigerated immediately.

Let stand at room temp for 24 hours. Store unopened jams in a cool, dry, dark place for up to 1 year. Refrigerate opened jam for up to 3 weeks.
But if you're anything like us, the jam won't last for three weeks in the fridge. As you can see, one batch made only four pint sized jars and I MUST have more! So my next attempt will be Huckleberry Raspberry Jam. Mmmmmmm!!!!
So, I was a little nervous to say the least. I don't do a lot of canning, nor do I know a lot about it. As I was preparing to make this, I was wishing my mother-in-law was right next to me to help me through it. She's a PRO at canning. I'm a total rookie.
But it worked out! Yay!! I took some pictures to walk you through the basic steps of making jam. Now, one thing you should know is that depending on what pectin you purchase, the recipes vary. FOLLOW THE RECIPES THEY GIVE YOU INSIDE THE PACKAGE. Since the recipes are different, I'll just walk you through how to do it - no recipe included.
Here's what you do:
Bring a boiling-water canner, a little more than half full with water, to a simmer.
Wash jars and screw bands in hot, soapy water; rinse with warm water. Let stand in hot water until ready to use. I keep the flat lids in the hot water as well. Drain well and dry off just before filling.
Prepare fruit as directed. Whatever you do, do not puree the fruit! You want the jam to have fruit bits. So, crush with a potato masher or pulse in a food processor.
Measure exact amount of sugar in a separate bowl and set aside.
Measure exact amount of prepared fruit into a 6 or 8 quart saucepan. Stir in pectin and a 1/2 teaspoon of margarine or butter to reduce the foaming. Bring mixture to a full rolling boil (it doesn't stop bubbling when stirred) on high heat; stirring constantly.
Stir in the sugar quickly, all at once. Return to a full rolling boil and boil for exactly 4 minutes; stirring constantly.
Remove from heat and skim off foam with a metal spoon.
Remove approximately 3/4 of the seeds then ladle into prepared jars, filling to within 1/8 inch of tops. Wipe jar rims and threads clean. Cover with lids and screw band tightly.
Place jars on elevated rack in canner. Lower rack into canner. Water must cover jars by 1-2 inches; add boiling water if needed. Cover; bring water to a gentle boil. Process jams according to instructions. Make any adjustments for your altitude if needed.Remove jars and place upright on a towel to cool completely. After jars cool, check seals by pressing middle of lid with finger. If the lid springs back, it is not sealed and will need to be refrigerated immediately.
Let stand at room temp for 24 hours. Store unopened jams in a cool, dry, dark place for up to 1 year. Refrigerate opened jam for up to 3 weeks.
But if you're anything like us, the jam won't last for three weeks in the fridge. As you can see, one batch made only four pint sized jars and I MUST have more! So my next attempt will be Huckleberry Raspberry Jam. Mmmmmmm!!!!
Friday, August 13, 2010
My Busy-ness
Here are a few of my projects that have kept me busy this summer...

My son's pirate ship b-day cake

My baby's Choo-choo train b-day cake

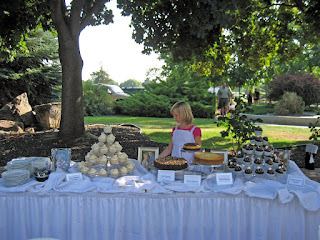
I catered the desserts at my sister's wedding reception. She had a beach theme, so these lemon raspberry cupcakes had crushed graham crackers to resemble sand and a white chocolate sea shell on top.

These dark chocolate Bavarian cupcakes had sugar pearls and white chocolate sea shells on them.

My new brother-in-law loves cheesecake, so we had to have them as well!

Talk about FUN!!!
Oreo Fudge Pops
Hello, my friends!!! It's been a while and I'm so sorry for it. I've been busy. Really busy. Since the last time I posted (which was the end of April - that's so, so sad), I've been busy with end of school activities, birthdays, a garage sale, catering, having fun with the kids, bottle-feeding calves, traveling, a Carrie Underwood concert, family reunions, more catering, bike rides, tending a garden, walks, BBQ's, camping, family, a wedding reception, and getting ready for school to start again. I even got a new job this summer too. I'm now a Dessert Specialist and I'm SOOOOOOOOOOOOOO excited about it!!!
Like I said, I've been busy. But today I have some free time and really wanted to post a sweet treat that I recently made with the kids. They loved it and it was super
easy and nice and cold for these hot summer days.
Here's what you'll need:
1 (3.9 oz.) pkg. instant chocolate pudding
2 C. milk
6 Oreo cookies (or about 1/2 C. crushed Oreo's - or more if you want, like I did)
1/2 C. thawed Cool Whip
Beat pudding mix and milk in a large bowl with a whisk for 2 minutes.


Place cookies in a resealable plastic bag and crush with a rolling pin. Add cookies and Cool Whip to pudding; stir just until blended.


Spoon into 9 (3 oz. - those mini bathroom paper cups) paper cups.

Insert wooden pop sticks or plastic spoons into each for a handle.

Place on a tray and freeze for 5 hours or until firm.

When ready to eat, let sit for 10-15 minutes, then gently pull out of the cups.

A perfect treat for a hot summer day!
Enjoy and I hope to be back soon!!
Wednesday, April 28, 2010
Twice Baked Potatoes
I've been making lunches for the guys that my husband works with over the last several Saturdays. One thing they mentioned that they REALLY like are twice baked potatoes. So, this last weekend, I made some for them and I think they turned out Heavenly!!
This recipe comes from one of my mom's closest friends (and my good friend, Amy's mom), Janet. I found the recipe in a ward cookbook my mom gave me several years ago and have loved it ever since! Janet calls them "Jailbreak Potatoes" and I can see why. Anyone would break out of jail for these taters!!
Here's what you'll need:
4 lg. potatoes
2 T. butter, melted
1/2 C. whipping cream
1/2 tsp. salt
1/4 tsp. white pepper
1/2 C. shredded Parmesan cheese
 Whip the potato mixture until smooth.
  Spoon the mixture back into the skins. Place the stuffed potatoes on a buttered, rimmed baking sheet and bake an additional 15 minutes or until thoroughly heated.
 I didn't get an after shot since I whisked them off to Brett's work. But the looked very similar to the picture above, but they had several golden peaks on them. Gorgeous and delicious!! Love them!!!!
This recipe comes from one of my mom's closest friends (and my good friend, Amy's mom), Janet. I found the recipe in a ward cookbook my mom gave me several years ago and have loved it ever since! Janet calls them "Jailbreak Potatoes" and I can see why. Anyone would break out of jail for these taters!!
Here's what you'll need:
4 lg. potatoes
2 T. butter, melted
1/2 C. whipping cream
1/2 tsp. salt
1/4 tsp. white pepper
1/2 C. shredded Parmesan cheese
Preheat oven to 400 degrees. Scrub and prick each potato. Bake the potatoes for 1 hour or until flaky. Remove from oven and cool slightly. In a large mixing bowl, place butter, cream, salt, pepper, and cheese. Cut an oval of skin off of the tops of each potato and scrape out most of the potato's interior and put into the bowl with the other ingredients. 
As you can see, I was making these for a crowd and used more than 4 potatoes.
Whip the potato mixture until smooth. Spoon the mixture back into the skins. Place the stuffed potatoes on a buttered, rimmed baking sheet and bake an additional 15 minutes or until thoroughly heated. I didn't get an after shot since I whisked them off to Brett's work. But the looked very similar to the picture above, but they had several golden peaks on them. Gorgeous and delicious!! Love them!!!!
Monday, April 26, 2010
B.L.T. w/ A.
I loooooooooooooooooooooove B.L.T.'s!!! I also looooooooooooooooooooove avocados. So, yesterday for lunch, I made B.L.T.'s with avocado and I was in HEAVEN!!!!! It's one of those simple pleasures in life. Enjoy!
Here's what you'll need:
Toasted Multi-Grain bread (or any bread)
cooked bacon slices
washed lettuce leaves
sliced tomato
sliced avocado
Slather your toast on one side with mayo or Miracle Whip. Place bacon on one piece of toast and top with lettuce, tomato, and avocado. If desired, season avocado with a dash or two of salt and pepper. Top with the other piece of toast. Cut in half and devour.
 So good!!!
Breakfast Pockets
One Saturday morning, I had an itch to make something new and different for breakfast. After the wheels in my head were turning for a while, I decided to make my own breakfast pockets. It was so much fun to create something new for us.
Here's what you'll need:
10 eggs
1 lb. sausage, cooked & crumbled
2 C. shredded cheese
4 (7.5 oz) tubes refrigerated biscuits

Here's what you'll need:
10 eggs
1 lb. sausage, cooked & crumbled
2 C. shredded cheese
4 (7.5 oz) tubes refrigerated biscuits
Cook the sausage and set aside.  Scramble the eggs and cook in the same pan that you cooked your sausage in, scraping the bottom to get all of the yummy sausage bits in your scrambled eggs.
  Cook until creamy and still wet.
  Add sausage and combine.
  Roll out biscuits into thin circles.
  Put a mound of the sausage and egg mixture on the center of half of the rolled out biscuits.
 Sprinkle cheese over the egg mixture.
  Place another rolled-out biscuit on top and press the edges to seal.
  Place on a baking sheet and bake at 400 degrees for 11-12 minutes or until golden brown. Remove to a cooling rack and brush with butter.
  Serve warm.
  Makes about 20 pockets.
Scramble the eggs and cook in the same pan that you cooked your sausage in, scraping the bottom to get all of the yummy sausage bits in your scrambled eggs. Cook until creamy and still wet. Add sausage and combine. Roll out biscuits into thin circles. Put a mound of the sausage and egg mixture on the center of half of the rolled out biscuits. Sprinkle cheese over the egg mixture. Place another rolled-out biscuit on top and press the edges to seal. Place on a baking sheet and bake at 400 degrees for 11-12 minutes or until golden brown. Remove to a cooling rack and brush with butter. Serve warm. Makes about 20 pockets.The kids and I really liked these. I also liked that we could just grab some out of the fridge, warm them up, and eat them on the run. But next time I'm going to try them with some country gravy or a cheese sauce to eat with a fork. Yummmmm!!!!
Chocolate Sheet Cake
My sister-in-law, Shannon, introduced me to the Pioneer Woman's Chocolate Sheet Cake, but made with dark chocolate. It's WONDERFUL!!! She made the same recipe, while here visiting, but used regular cocoa powder as the recipe calls for. We all agreed that it's nothing special with regular cocoa. But using dark cocoa really does make it divine!!!!!! 


 My fork sinks down slowly - it doesn't drop right down and it doesn't stay in place - it sinks down slowly. If yours drops straight down, add a little more powdered sugar. If it's too thick, microwave it or add a little more milk.
Here's what you'll need:
2 C. flour
2 C. sugar
1/4 tsp. salt
1 C. butter
4 heaping T. dark cocoa
1 C. boiling water
1/2 C. buttermilk
2 beaten eggs
1 tsp. baking soda
1 tsp. vanilla
In a mixing bowl, combine the flour, sugar, and salt. In a saucepan, melt the butter then add the dark cocoa. Stir to combine. Add boiling water and boil for 30 seconds, then turn off the heat. Pour over the flour mixture and stir lightly to cool.
Pour over the flour mixture and stir lightly to cool.In a small bowl, combine the buttermilk, eggs, baking soda, and vanilla and beat well. 
(I didn't have any buttermilk on hand, so I just got a little less than a 1/2 cup of milk and added enough vinegar to make a 1/2 cup.)
Beat the buttermilk mixture into the flour/chocolate mixture and pour into a sheet cake pan.
 Bake at 350 degrees for 20-25 minutes.
Bake at 350 degrees for 20-25 minutes.While the cake is baking, make the dark chocolate icing:
1 3/4 sticks (14 T.) butter
4 heaping T. dark cocoa
6 T. milk
1 tsp. vanilla
1 lb. minus 1/2 C. powdered sugar
1/2 C. chopped pecans, opt.
In a microwavable bowl, melt the butter in the microwave and add the cocoa. Stir to combine. Add the milk, vanilla, and powdered sugar. Stir together. Add pecans, if desired. 
My fork sinks down slowly - it doesn't drop right down and it doesn't stay in place - it sinks down slowly. If yours drops straight down, add a little more powdered sugar. If it's too thick, microwave it or add a little more milk.It's runny, but allow it to sit and set up slightly until the cake is finished baking and cooled slightly. Pour over warm (not hot) cake.
This is sheer chocolate bliss!!!!!
Subscribe to:
Posts (Atom)
