Hi everyone! Thanksgiving's almost here and there's excitement in the air around here! This year, my kids and I are heading to Boise to celebrate Thanksgiving with my family and we cannot wait!! To make things easier on the host, my sister, Shauna (who just had her first baby and I can't wait to meet him), we've all been given food assignments for while we are there.
I'm in charge of the pies for Thanksgiving dinner and then the breakfast on Saturday. So, I just wanted to let you know what I'll be making...
Pie Crust
Pumpkin Pie
Pecan Pie - 1 regular pecan pie and 1 chocolate pecan pie (mmmmmmm...)
Breakfast Burritos
I LOVE getting together with family because you know there will always be great company and wonderful food. I hope you all have a happy Thanksgiving!!
Happy cooking and, even more, happy eating!!!
Tuesday, November 22, 2011
Monday, November 14, 2011
Milk & Cookies Baby Shower
I hosted a baby shower last weekend for my friend, Robyn. I went with the theme of Milk & Cookies, something very simple, but sweet at the same time. So, I thought I'd post some pictures from the shower to give others some ideas if they have a shower to give coming up...


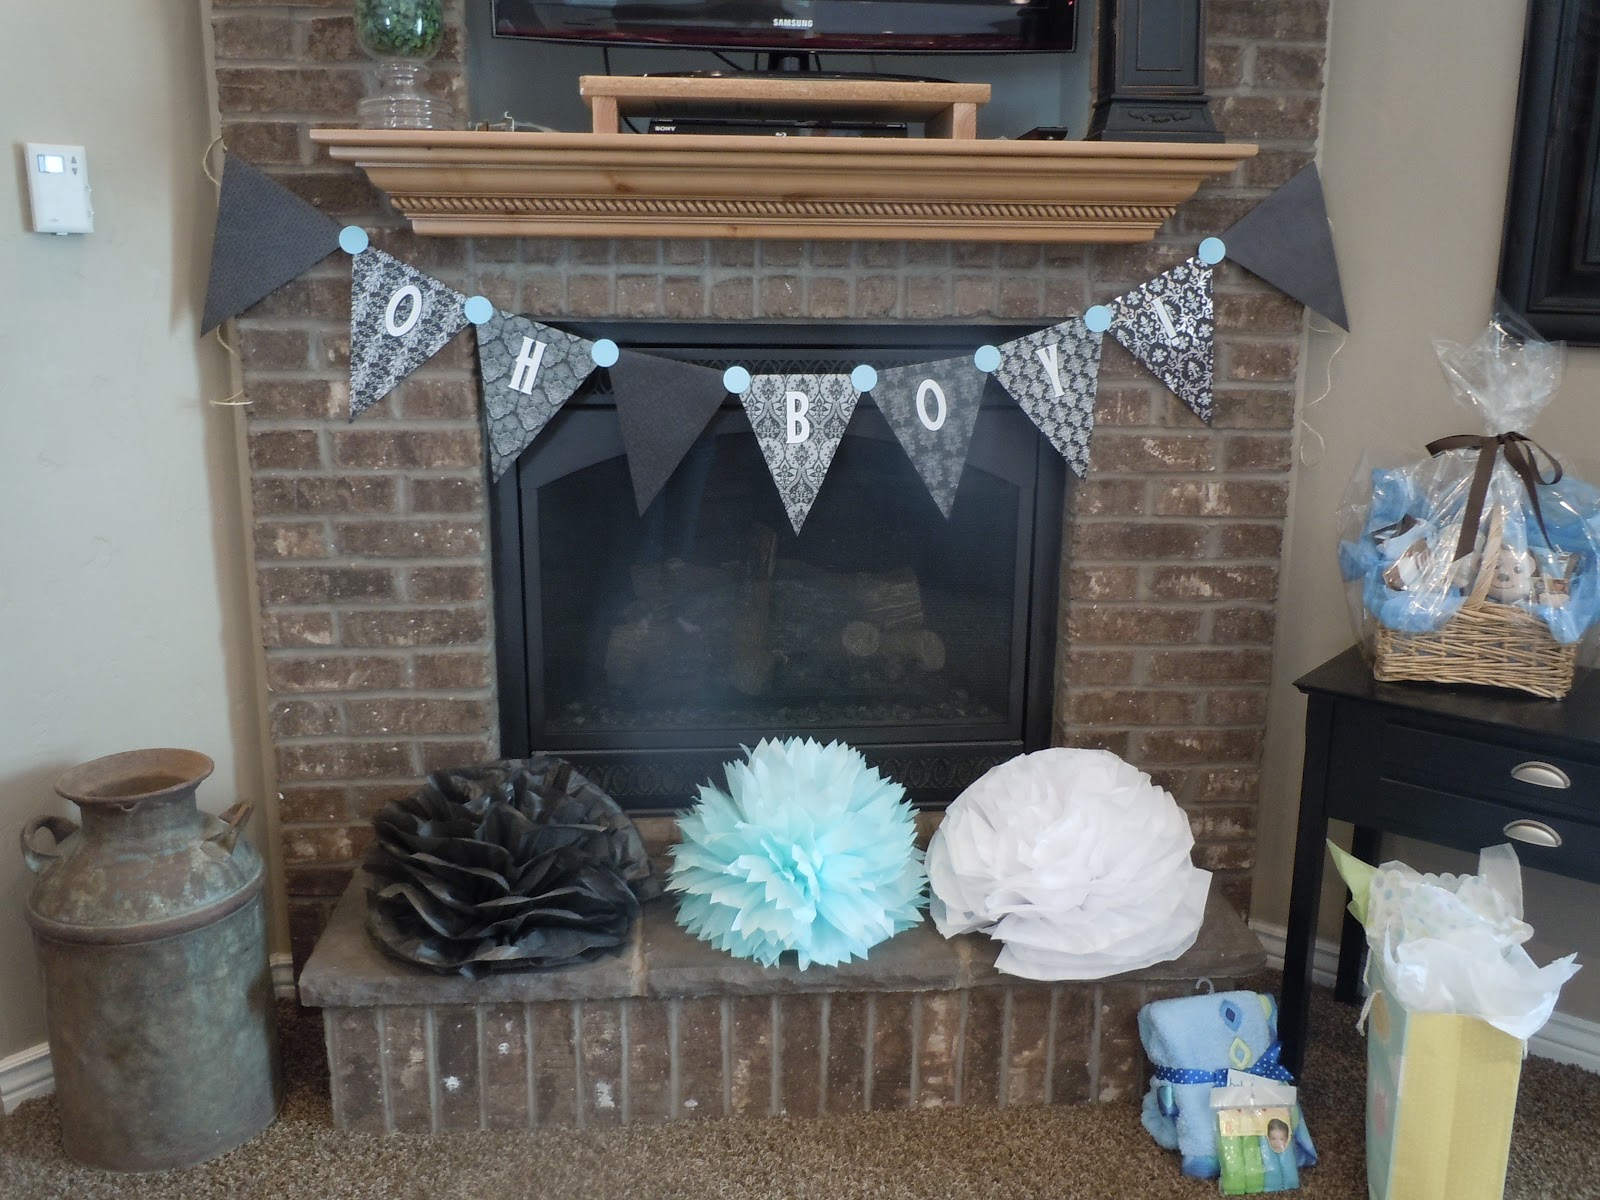
Everything was so much fun! I can't wait for my next party to host!!
Tuesday, October 25, 2011
Sliced Baked Potatoes
Living in Idaho and having in-laws who own a potato farm, I have lots of opportunities to use potatoes in my cooking.
Just last week, my in-laws finished harvesting all of their potatoes, a mighty feat every year! It sounds like this year they were very happy with how they turned out too.
My kids got to go and help with the harvest a few times and each time they brought home some real treasures.

Look at these spuds!!! They're both over 8 inches long!
So in celebration of a great harvest, I'm posting a way to use the wonderful potato. Today's recipe is a very simple, yet very elegant way to use potatoes. And there's hardly a "recipe" for it; just make it to how you would like it. Pretty easy.
Here's what you'll need:
Russet potatoes (however many you want)
Olive oil
Melted butter
Salt (table salt and/or course sea salt)
Pepper
Clean each potato and let dry completely. Slice each potato into thin slices, but don't cut completely through the potato. You'll want the bottom of the potato to stay in tact. Place on a baking sheet and brush with melted butter, then drizzle with oil, and finally season with salt and pepper.


Monday, October 17, 2011
Chocolate Covered Caramel Apples
Halloween is in two weeks! Are you ready? I'm not. We've still got to figure out what costumes to get for the kids. But one thing I've done in anticipation for the Halloween season is make yummy caramel apples.
For some reason, I just can't eat caramel apples unless it's October. Weird, I know. But, wooo-hooooo for it being October now!! These treats are super delicious and easy too!

Here's what you'll need:
5 medium apples, washed and completely dry
One bag of caramels or caramel bits
2 T. water
1 C. chocolate chips
1 - 1 1/2 T. shortening
Any candy, chopped (opt.)
When I saw these at the store, I knew I had to try them. I LOVED that I didn't have to unwrap tons of caramels. So easy!!

Place the caramel and water into a medium pan.

Heat on Medium-Low until the caramel is melted and smooth.

You can push sticks into the apples before dipping them, but I didn't have any. So I just made sure the apples I used had stems to hang on to.
Dip the apples into the warm caramel. Set them on a parchment lined tray (you can spray the parchment paper with non-stick spray if desired).

You should have some caramel left over in your pan. Scoop it out and drizzle it over the apples. It may look funny at first, but don't worry. The caramel will slowly ooze down and cover the apple more smoothly after a while.
Place the caramel covered apples into the fridge and refrigerate for 1 hour.

While you're waiting, you can chop whatever candy you would like to cover the apples in. I went with Snickers. I used a whole bag of the fun-sized candy bars. Chop them small. Mine are a little bigger. I'd probably go smaller next time.

After the caramel has set on the apples, you'll notice that there's some at the bottom of each apple. No worries. Just mold the caramel back up onto the apple. Or if you'd rather, you can just cut it off and eat it.

Once you've got the caramel pressed back up, you're ready for dipping. I melted milk chocolate chips with the shortening in the microwave for 30 seconds on High, stirred it well, then microwaved it for another 15 seconds until the chocolate was smooth and the shortening was incorporated.

Holding on to the apples by the stick or the stem, dip the caramel apples into the chocolate, turning to cover it all. Or pour some chocolate over the top and let it run down the apple.
For the candy covered apples, I dipped the whole apple into the chocolate. And for the chocolate covered caramel apples, I drizzled chocolate over the top. You can do whatever you'd like.
If you want your apples covered with candy, roll the chocolate covered caramel apples into your chopped candy coating well.
Place back onto the parchment lined pan to set.

Refrigerate until ready to use.

I took these to a party and gave away two of the candy covered ones as gifts. Everyone loved them!
So I only had the chocolate covered caramel apples left to photograph. They were both VERY good!
Enjoy, my little pretties!
Monday, October 10, 2011
Oven Sprite Can Chicken
First of all, I have to say WELCOME to all of the new followers and people coming to check out my food blog!!! Can I just tell you how excited I am to have you?! I truly hope you find some recipes on here that you and your loved ones can enjoy. I'm so glad you're here!
On to today's recipe...I came across this recipe in our ward cookbook and I'd heard about cooking techniques like this, but never tried them. On this particular day, I happened to have everything I needed to make this dish. So I whipped it together with every intention of it turning out like most other roasted chickens - dry and not much flavor.
Once we tried this for dinner, I was blown away with the flavor and moistness of the meat! Oooooh, baby, I won't be cooking chicken any other way now!

Here's what you'll need:
1 C. butter
2 T. garlic salt
2 T. paprika
Salt & Pepper to taste
1 (12 oz.) can Sprite (or anything similar)
1 (3.5-4 lb.) whole chicken, rinsed and patted completely dry
Preheat oven to 300 degrees. In a small skillet, melt the butter, then add the garlic salt, paprika, salt (I probably used about 1/2 tsp.) and pepper (about 1/4 tsp.). Discard 1/2 the Sprite, leaving the remainder in the can.
**That's what the recipe says. I say pour half of it into another glass, add some Torani raspberry-flavored syrup and a couple of cubes of ice, and you'll have something yummy to sip as your making the rest of dinner.**
Using a funnel, very carefully and very SLOWLY pour half of the melted butter mixture into the Sprite can. If you pour it in too fast, it will bubble out all over your counter, just like it did to mine.

Place can on a rimmed baking sheet then set the chicken over the can, inserting the can into the cavity of the chicken. Try to keep all of the naked chicken jokes and narrations in your head at this point. Otherwise your children may think you're crazy.

Baste chicken with the remaining melted butter mixture.

Place baking sheet with the Sprite can and chicken carefully into the oven. Bake for about 3 hours, or until the internal temperature of the chicken reaches 180 degrees.
Monday, October 3, 2011
Southern Peach Cobbler
Guess what I have. A big box of fresh peaches sitting on my counter. Peach season is here and I love it! So does the rest of my little family. I really should be canning them, but eating them fresh and baking with them are just way more fun for me!
We've been eating them in our crepes with a fresh strawberry sauce. We've eaten them sliced, sugared, and drenched with milk (like peaches and cream). And, of course, we've been chowing down on them as they are. But my favorite way to eat these juicy, sweet globes is as peach cobbler.
Did you know that I'm originally from Georgia? That's right, I'm an official Georgia Peach! Maybe that's why I like peaches so much. And, maybe that's why this recipe for Southern Peach Cobbler spoke to me, cuz I really am a Southern Belle (that last part was totally meant to be read with a Southern accent). ;)
Anyway, I got the original recipe from allrecipes, but changed it a touch, as usual. I really do hope you get a chance to try this recipe out. It may seem a little daunting at first, but once you make it, you'll see how easy it really is. And it is so good!
Here's what you'll need:
Peach Mixture:
8 fresh peaches, peeled, pitted, and sliced into wedges
1/4 C. white granulated sugar
1/4 C. brown sugar
1/4 tsp. cinnamon
1/8 tsp. nutmeg
1 tsp. lemon juice
2 tsp. cornstarch
Pastry Mixture:
1 C. flour
1/4 C. white granulated sugar
1/4 C. brown sugar
1 tsp. baking powder
1/2 tsp. salt
6 Tbsp. cold butter, cubed
1/4 C. boiling water
Cinnamon Sugar Mixture:
1 1/2 Tbsp. white granulated sugar
1/2 tsp. cinnamon
In a large bowl, combine all of the dry Peach Mixture ingredients, then add the sliced peaches. Toss evenly to coat.


My little Aubree wanted to be the photographer for me.


Pour the peaches and juices into a 7 1/2" x 11" baking dish. Bake at 425 degrees for 10 minutes.

While the peaches are baking, in a medium bowl, combine the dry pastry ingredients. Blend in the butter with a pastry blender, or two knives, until you get lots of pea-sized portions. Stir in the water until just combined. Don't over mix this.

In a very small bowl, combine the cinnamon and sugar and set aside.

After the peaches have baked for 10 minutes, pull them out of the oven and sprinkle some of the cinnamon sugar mixture over the peaches. Then glob the pastry mixture over the top of the peaches. Sprinkle with the remaining cinnamon sugar.

Continue baking for 25-30 minutes or until the topping is golden brown.


Enjoy with a big scoop of vanilla ice cream! YUM-MMMY!!
Wednesday, September 28, 2011
Chocolate Dipped Peanut Butter Pretzel Sandwiches
Are you hooked on Pintrest like I am? What a wonderful place to go to get great ideas and so many different kinds of yummy recipes! Today's recipe is one that I've seen floating around as other's pins. It's one that I've been making for a while, given to me by my aunt Janell. Talk about DELICIOUS!!
On all of the recipes that I've seen on Pintrest and other food blogs, those recipes call for brown sugar. I remember Janell advising me to use all powdered sugar and no brown sugar in the recipe. The first time that I tried it, I thought I'd stick to the original recipe. So I used brown sugar. BLAH!! It gives the filling a grainy texture, not like the smooth and creamy filling I had tried at my aunt's house.
Ever since then, I only make this recipe using powdered sugar - NO BROWN SUGAR. It makes a world of difference!
Another change I'd recommend is using pretzel snaps (square pretzels) rather than these mini twisted pretzels. The filling stays in much better.
Finally, on to the recipe...
Here's what you'll need:
2 C. creamy peanut butter
4 T. softened butter
3 C. powdered sugar
1 bag of pretzel snaps (not butter snaps, pretzel snaps) (or mini twisted pretzels if you must)
1-2 bags of chocolate chips (milk or semi-sweet, I prefer semi-sweet)
Beat the peanut butter and butter until smooth. Add the powdered sugar and mix until well combined. Make a 1-inch ball of the peanut butter mixture and press between two pretzels. Place on a cookie sheet. When the sheet is filled, place it in the freezer for approximately 30 minutes to firm. Dip peanut butter/pretzel sandwiches halfway into some melted chocolate. Place on a parchment lined cookie sheet and freeze or refrigerate again until firm. Then they're ready to eat!

Peanut Butter + Chocolate + Sweet + Salty + Crunchy + Creamy = The Perfect Munchies
Enjoy!!
Saturday, September 17, 2011
Chicken Penne Pasta
I was talking to my mom on the phone the other night and she was telling me that she most enjoys the main dish recipes I post on here. And I think she's much like most people - you just like to try new things for dinner. It's an extra bonus when it's a quick, easy, and YUMMY dinner!
I got this recipe from my friend, Kolette, who got it from our friend, Heidi. Both wonderful cooks who I trust entirely. So I was looking forward to giving this recipe a try. I love how simple it is to make and even more, how delicious it tastes.
Here's what you'll need:
1 (16 oz.) package penne pasta (or other pasta, I used bowtie)
1 (26 oz.) jar spaghetti sauce
1 jar Alfredo sauce
3 C. shredded Mozzarella cheese
3 C. cubed chicken, cooked
Place 1/2 the spaghetti sauce in the bottom of a 9x13 inch pan. (I used 4 ramakins and a 7 1/2x11 inch pan since I needed individual servings for a special dinner I did.) Layer 1/2 the pasta then 1/2 the Alfredo sauce, all the chicken, and 1/2 the cheese. Repeat layers without the chicken. Cover with foil and bake at 350 degrees for 40 minutes.


See how easy that is?! LOVE IT! I might even try replacing the chicken with a sweet Italian sausage next time. Mmmmmm...
Sorry I didn't get any after pictures. It was gone in no time flat. I hope you enjoy it like we did!!
Saturday, September 10, 2011
Apple Muffins
What a fun summer we've had!! It was filled with picnics, parks, friends, birthday parties, bike rides, family, evening walks, campfires, gardening, water parks, and an awesome trip to Jackson, WY. I really didn't want all the fun to end. But, alas, all good things must come to an end, I guess. So, thanks for letting me take a vacation, but now I'm back and ready to start blogging once again.
One bad part about my summer was that my computer crashed. Again. But this time, zero of my pictures were saved. So all those fifty-something recipe pictures I had ready to post? They're gone. All gone. Bummer. I guess I have some major cooking to do so that I can keep updating. Shucks. ;)
About a week ago, we were up at my in-law's having Sunday dinner. My mother-in-law asked if I wanted any apples from her very well producing apple tree. YES, PLEASE! So, we took home a grocery sack filled to the brim with these DELICIOUS apples! And as I said on Facebook today, they've been sitting on my counter begging me to bake with them. So I now have a whole list of things I'd like to make using these yummy apples.
First on my list that I made today are apple muffins. This recipe came from a roommate, Becky, my Freshman year of college. I was always so impressed with Becky because when she cooked, she made some pretty amazing food. Well, it looked pretty amazing compared to what I ate. She used the oven to make things. I usually ate carrot sticks and PB&J sandwiches. I was very impressed.
These muffins were one of the things Becky made. And she actually let me eat one (I believe it was because we were moving out and she wasn't taking them with her and she didn't want them to go to waste). I thoroughly enjoyed it and asked for the recipe.
When I made these today, my kids have been snarfing them down. SNARFING.
Here's what you'll need:
3C. flour
1 C. sugar
4 tsp. baking powder
1 tsp. salt
1 tsp. cinnamon
2 eggs
1 C. milk
1/2 C. oil
2 C. grated apples
Combine the first 5 ingredients. In a separate bowl, combine the eggs, milk, and oil. Beat well. Set aside. Get your apples ready. I like to use my apple slicer, that way you cut out the core and you have small, manageable slices to peel. Peel the skins then shred or dice. Which ever you prefer. I have an old Salad Shooter that I use to make shredding a breeze.

It's okay if your apples brown; they'er going into a brown batter. No big deal.
Combine your wet and dry ingredients only until moistened, then gently stir in your apples. You don't want to over mix the batter or else you'll end up with tough muffins. You want them to be nice and tender.


Preheat your oven to 400 degrees. Grease muffin tins (I like to use the baking spray with flour). Scoop the muffin batter into the tins filling them 2/3 - 3/4 of the way full. I just use one large cookie scoop per muffin.

Bake for 15-20 minutes, the recipe says. I baked my on convection for 14 minutes. So, just keep an eye on them and take them out when they start to turn golden brown. Remove from the pan and cool on a cooling rack.

Then watch your kids snarf them all. Next time I'll be doubling the batch!
Saturday, June 18, 2011
Caramel Fruit Dip / Stuffed Strawberries
Hi there! It's been a while, hasn't it? Can you believe that we're already more than half way through June?! I can't. I hope you all have been enjoying your summer.
It hardly feels like summer here. We've only had a few days that have been over seventy degrees. It still feels like spring. But, hey, I'll take it. At least it doesn't feel like winter!
Since it's supposed to be summer, I have a yummy fruit dip that I'd like to share with ya. It's SUPER simple and way good!!
Here's what you'll need:
1 (8 oz.) pkg. cream cheese, softened
1/2 C. packed brown sugar
1/4 C. caramel ice cream topping
Toffee bits (opt.)
Assorted fresh fruit
In a small mixing bowl, beat the cream cheese, brown sugar, and caramel topping until smooth.

You can add toffee bits sprinkled on top or mixed in. Serve with fresh fruit. Refrigerate leftovers. Makes about 1 1/2 cups.
I decided to pipe it into strawberries rather than leave it in a bowl as a dip. They turned out way cute and super yummy!

I also decided to sprinkle the tops with toffee bits.

SO GOOD!!!!
Enjoy these some time this summer!
Subscribe to:
Posts (Atom)