Wednesday, September 29, 2010

Banana Chocolate Chip Cookies

Since getting our computer back, fixed and no files lost, I decided I'd better go through my pictures and make a list of what's on my computer waiting to be put on my food blog. Guess how many I found.....65!!! I believe I did this not too long ago and even finished those recipes. Now I have 65 more! I guess that's what I get for taking the summer off.

In an effort to catch up, I've posted four recipes today. So keep reading to see what else has been cooking around here.


Almost every Sunday, my hubby and I like to try a new recipe for some kind of cookies. When we tried this recipe from my friend, Marcel, we both agreed, this is why we keep trying new recipes. We find gem recipes that are definite keepers, like this one. Thanks, Marcel!!!

Here's what you'll need:

1 C. butter
2 C. sugar
3 eggs
2 medium mashed ripe bananas
4 C. flour
1/2 tsp. baking soda
2 tsp. baking powder
1/2 tsp. salt
1 tsp. vanilla
chocolate chips
chopped walnuts (if desired)

Cream butter. Add sugar, eggs, and vanilla.
In a separate bowl, combine the flour, baking powder, baking soda, and salt. Add alternately with mashed bananas.
(If I remember correctly, I added the bananas and then the flour. They turned out just fine.)

Add chocolate chips and walnuts, if desired.
Drop on greased cookie sheet.
Bake at 400 degrees for 9 minutes with a regular oven or 7 minutes with a convection oven.

Aaahhhhh...perfection!!!

Do you think I added enough chocolate chips???

Mini Meatloaves

My kids thoroughly enjoy this recipe! They think it's so fun to get their very own mini sized meatloaf. And even better than that, they love the surprise that's inside of them!! I love how easy these are to make. Thanks to Kraft for the recipe!

Here's what you'll need:

1 lb. ground beef
1 (6 oz.) pkg. Stove Top Stuffing mix
1 C. water
2 T. A-1 sauce (opt.)
1 tsp. garlic powder
favorite BBQ sauce
shredded cheddar cheese

Preheat oven to 375 degrees. Mix meat, stuffing mix, water, A-1 sauce (if desired), and garlic powder until well combined. (And as usual, I doubled this recipe in the pictures.)
Press into 12 medium muffin cups sprayed with cooking spray; make an indentation in the center of each with the back of a spoon.
Fill with BBQ sauce.
Bake for 30 minutes or until meatloaves are cooked through. Top with shredded cheese and continue to bake until the cheese is melted.
Let stand 10 minutes before serving.

Another fun reason why I like this recipe is because you can totally change up the flavors! Here are some variations you should try as well:

Italian - instead of the garlic powder, substitute it with 1 tsp. Italian seasoning. Instead of the BBQ sauce, fill the meatloaves with spaghetti sauce. And instead of the shredded cheddar cheese, substitute it with Mozzarella.

Fiesta - substitute the garlic for 2 tsp. chili powder, sub the BBQ sauce for salsa, and substitute the cheddar for Mexican style cheese.

Mediterranean - sub the garlic for 1 tsp. dried oregano leaves, the BBQ sauce for chopped, roasted red peppers, and the cheddar for traditional crumbled Feta cheese.

Enjoy!!!

Microwaved Corn on the Cob

We planted a garden this year. We even tried two varieties of corn - a super sweet yellow and a super sweet red. We were so excited about it! But thanks to the weather this summer, our garden didn't turn out very well. We had four corn stalks that made it out of the ROWS that we planted. And of the four stalks, we got about eight tiny ears. Bummer, cuz we like corn on the cob!

So, the following pictures are of corn we got at the store. But this technique of cooking it is wonderful since it is quick and easy - and that's how I like things!

Here's what you'll need:

however many ears of corn you want
butter
salt
pepper

Shuck the corn, but still leaving a thin layer of the husk still on. Pull off any excess "hair".

Place however many ears can fit into your microwave in a single layer. I can fit four in mine. Microwave on High power for approximately 5 minutes. Remove from the microwave (be careful, they'll be hot!). Shuck the rest of the way.

If you'd like, and most people do, smear it down with butter, add some shakes of salt and pepper, then chow down. But if you're like me, just enjoy the natural sweetness of corn on the cob without all the extras.

Egg Salad with Avocado

A while ago, I decided to cook out of my sister's cookbook for an entire month. One of the recipes I tried, we LOVED! But there are two requirements for one to enjoy this recipe: 1. you have to like egg salad, and 2. you have to like avocado. If you fit these requirements, I think you'll love this recipe like we do.

Here's what you'll need:

10 hard boiled eggs
3 T. mayo or Miracle Whip
1 tsp. Dijon mustard
1 T. freshly squeezed lemon juice
1/2 avocado, mashed, and 1/2 avocado, chopped
salt and pepper
lettuce
tomato slices

Using a pastry blender or fork, mash together hard boiled eggs and half an avocado.
Stir in mayo or Miracle Whip, mustard, and lemon juice; season with salt and pepper.
Carefully fold in chopped avocado.
Divide egg salad among toasted bread. Top with tomato slices and lettuce.

Yum, yum, yum!!!

Wednesday, September 22, 2010

Cruise Food

My hubby and I got back a few days ago from a cruise we took to the Western Caribbean with some friends of ours to celebrate our 10 year anniversaries. We had such a great time!

Before our cruise, we had heard so much about the food you constantly eat on a cruise. Well, I was amazed at how BEAUTIFUL everything looked! I don't take the time to make my food look good, so I thoroughly enjoyed the extra work those on the cruise went to to make our food look spectacular.

Here's a taste of some of the delicious dishes we had...

Chilled Strawberry Soup

Crab Cakes

Ice Cream Pie (to celebrate our anniversary - they even sang to us too!)

Escargot (I was so proud of myself to trying it and I actually quite liked it)

Herbed Chicken Fingers with Melon and Cucumber scrolls

Fresh Fruit Cheesecakes

Black Forest Cake

Tuxedo Chocolate Dipped Strawberries

Prime Rib and Au Jus with Onion Rings and Baked Potato

Lobster and Shrimp (my FAVORITE meal)

Stuffed Mushrooms

Assorted Fresh Fruit with Mango Coulis
So much fun!!! I may go on another cruise just to admire the food!

Hearty Chocolate Chip Cookies

Yesterday, I hosted a playdate for some friends of mine and their kids. Everyone was to bring something to munch on, so I decided to make these hearty chocolate chip cookies. Most kids like chocolate chip cookies and I like that these cookies are actually quite good for you.

None of the kids (or the ladies) guessed that they have healthy ingredients. Hee, hee, hee. I feel so sneaky!!

Here's what you'll need:

1 C. shortening
1/2 C. butter (1 stick)
1 C. sugar
1 C. brown sugar
3 eggs
1 1/2 tsp. baking soda
1 1/2 tsp. salt
1 1/2 tsp. vanilla
1/2 C. powdered milk
2 C. all purpose flour
1 C. whole wheat flour
1/4 C. ground flaxseed
2 C. rolled oats
2 C. chocolate chips or raisins

Mix shortening, butter, and sugars. Add eggs one at a time. With the mixer still running, add soda, salt, and vanilla. Turn off mixer and add powdered milk, all flour, and flaxseed. Dough will be stiff. Stir in oats and chocolate chips. You can chill the dough until you're ready to use it, or just use it immediately. It can be refrigerated for up to three days.
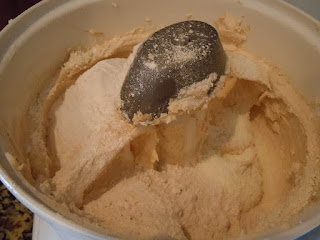
Using a medium cookie scoop (about 2 T. dough), scoop balls and place on an ungreased baking sheet. You can freeze them at this point. When frozen, remove from the baking sheet and place in a freezer bag and keep in the freezer for up to a month. Or bake at 350 degrees for 11-14 minutes, depending on if you want them chewy or more firm. If you're baking with a convection oven, only bake for 8-10 minutes.

Yummy!! And you don't have to feel guilty if you and the kids eat a few. Enjoy!

Friday, August 27, 2010

Just so you know...

My computer crashed. It sounds like I've lost everything I had on there - pictures of recipes and all. I'm currently using our dinosaur of a computer that is so incredibly slow. So, I won't be posting any new recipes until we get our computer fixed or replaced. Until then, enjoy the recipes that are already on here! Hopefully I'll be back soon!!

Saturday, August 21, 2010

New Things

Over the summer I've been thinking about some changes I'd like to make with this food blog. And, now, with my sister-in-law's help, I'm making them! One big change - I now have a button!! I'm so excited about it! So, please feel free to add a button to your own blog. If you have questions, let me know and I'll try to help you out.

Thanks!!

Hannah

Friday, August 20, 2010

Fresh-Squeezed Lemonade

Before summer is over, I wanted to post this recipe I tried for lemonade. It was DELICIOUS!!! We made it for Father's Day for my hubby and my father-in-law. I'm not sure what my father-in-law thought of it, but we LOVED it!!

Here's what you'll need:

2 C. sugar
1 C. water
2 C. fresh lemon juice
1 gallon cold water
1 lemon, sliced (0pt.)

In a small saucepan, combine the sugar and the 1 cup water. Bring to a boil and stir to dissolve sugar. This is called a simple syrup. Allow to cool and refrigerate until chilled. When you're ready to juice your lemons, roll them against the counter with your hand pressed on top to get the most juice out of your lemons. I happen to be using a lime in this picture since we were making both Lemonade and Limeade. We made the syrup and juiced our lemons the night before and let them chill in the fridge overnight, along with our gallon of water. Then when you're ready to serve it, combine the syrup, the lemon juice, and the gallon of water.


Serve cold in nice tall glasses with a wedge of lemon, if desired.

Sip it nice and slow and enjoy what's remaining of the last summer days.

Wednesday, August 18, 2010

Homemade Raspberry Jam

I'm new at this. I've never made jam before - like REAL jam. Not that super easy and not very good freezer jam. I rarely will even eat that. I mean the real deal raspberry jam, cooked and canned, and soooooooooooooooooooooooooooo delicious!!!

So, I was a little nervous to say the least. I don't do a lot of canning, nor do I know a lot about it. As I was preparing to make this, I was wishing my mother-in-law was right next to me to help me through it. She's a PRO at canning. I'm a total rookie.

But it worked out! Yay!! I took some pictures to walk you through the basic steps of making jam. Now, one thing you should know is that depending on what pectin you purchase, the recipes vary. FOLLOW THE RECIPES THEY GIVE YOU INSIDE THE PACKAGE. Since the recipes are different, I'll just walk you through how to do it - no recipe included.

Here's what you do:

Bring a boiling-water canner, a little more than half full with water, to a simmer.

Wash jars and screw bands in hot, soapy water; rinse with warm water. Let stand in hot water until ready to use. I keep the flat lids in the hot water as well. Drain well and dry off just before filling.

Prepare fruit as directed. Whatever you do, do not puree the fruit! You want the jam to have fruit bits. So, crush with a potato masher or pulse in a food processor.

Measure exact amount of sugar in a separate bowl and set aside.

Measure exact amount of prepared fruit into a 6 or 8 quart saucepan. Stir in pectin and a 1/2 teaspoon of margarine or butter to reduce the foaming. Bring mixture to a full rolling boil (it doesn't stop bubbling when stirred) on high heat; stirring constantly.

Stir in the sugar quickly, all at once. Return to a full rolling boil and boil for exactly 4 minutes; stirring constantly.

Remove from heat and skim off foam with a metal spoon.

Remove approximately 3/4 of the seeds then ladle into prepared jars, filling to within 1/8 inch of tops. Wipe jar rims and threads clean. Cover with lids and screw band tightly.

Place jars on elevated rack in canner. Lower rack into canner. Water must cover jars by 1-2 inches; add boiling water if needed. Cover; bring water to a gentle boil. Process jams according to instructions. Make any adjustments for your altitude if needed.

Remove jars and place upright on a towel to cool completely. After jars cool, check seals by pressing middle of lid with finger. If the lid springs back, it is not sealed and will need to be refrigerated immediately.

Let stand at room temp for 24 hours. Store unopened jams in a cool, dry, dark place for up to 1 year. Refrigerate opened jam for up to 3 weeks.

But if you're anything like us, the jam won't last for three weeks in the fridge. As you can see, one batch made only four pint sized jars and I MUST have more! So my next attempt will be Huckleberry Raspberry Jam. Mmmmmmm!!!!
Related Posts Plugin for WordPress, Blogger...