Monday, May 18, 2009

Chocolate Strawberry Pie

Wow, it's been a month and a half since I've posted on here last. There has been a lot going on, including my sister passing away. So I apologize for taking such a long break. And thank you for your patience.

Today's recipe is one I threw together for a treat on Mother's Day. My wonderful husband cooked a DELICIOUS dinner for me and while he was working on that, I was pondering on what to do with the strawberries we had sitting in our fridge. My first thought was to make a fresh strawberry pie. I have a really good recipe that I thought I'd try. But then I remembered how long it took to make. That was out!
I decided to use the container of strawberry glaze to mix with sliced strawberries to make a quick, fresh strawberry pie. And using a graham cracker crust would make it even more quick. So I sat on my couch picturing this pie I was going to make, when all of a sudden, there was a flash of chocolate (genious, really). That's when I decided to make this pie a chocolate strawberry pie, and boy am I glad I did. It was SOOOOOOOOOOOOOOOOOOOOOOOOOOOOOOOOOOOOOOOOOOO good!!!!!!! Everyone LOVED it! And I loved how quick and easy it was.
Here's what you'll need:
1 1/4 C. chocolate graham cracker crumbs (or you could use 1 1/2 c. oreos and no sugar)
1/4 c. sugar
6 T. melted butter
Mix together and press into a 9 inch (I used a 9 1/2 inch) pie plate. Bake at 375 degrees for 6-8 minutes. Or you could chill the uncooked crust for 45 mintues instead. But since I was going for the quick option, I baked it.
While the crust is cooling, combine one container of strawberry glaze with 2 lbs. halved strawberries. Dump into cooled crust and refrigerate. When you're ready to serve the pie, slice it and drizzle (or glob) warmed hot fudge sauce over top. Soooooo easy and yummy too!!!
Just take a look at this picture for a minute and try to taste the sinful combination of chocolate and strawberries. Now go make it; you'll be glad you did!!!

Thursday, April 2, 2009

Death By Chocolate Trifle

First, a quick explaination, I've been extremely busy lately and will still be for the next week or two. So, I'm not so sure about how diligent I'm going to be adding more recipes until I get moved into our new home (hopefully next weekend). So, don't give up on me, more will be coming, I promise!!! But for my last post, until I get moved in, I leave you with a sweet treat!

Here's what you'll need:

9x13 inch pan of brownies, homemade or from a mix (I used a mix due to lack of time)
1 large pkg. chocolate fudge instant pudding
12 oz. container Cool Whip
Toffe Bits (I use about half of a bag)

Bake your brownies, cutting off the edges and cubing once cooled.


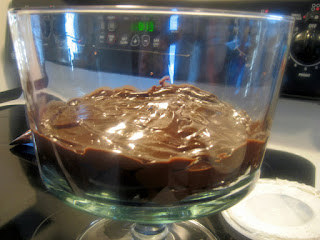
Using a trifle bowl,

make a layer of brownie cubes and sprinkle with toffee bits.

Then make a layer of pudding.

Top that with a layer of Cool Whip and sprinkle that liberally with toffee bits.

Start your layers over again - brownies, pudding, Cool Whip, and toffee bits. The top layer of Cool Whip I like to decorate by making fun little spikes. All you have to do is use the back of a spoon, touch it on to the Cool Whip and quickly pull up. Do this all over the top layer for a fun look.

Yum, yum, yum!!! This is one of the easiest desserts I make and it tastes so good and looks very impressive. You can also do the same thing in individual cups. It's super cute.

And trifles are one of the best things in the world. You can make your layers using anything you want! You can use chocolate and strawberries, or pound cake with raspberries and blueberries. Or try this specific dessert with oreos or the mint oreos (which I've done before and everyone loved them!). The possibilities are endless.

So if you don't have a trifle bowl, I would highly suggest getting one. No matter what you put in it (I also like to make a fresh fruit salad in mine), it makes the presentation more spectacular and they only cost about $10-$20. Enjoy!!!

Wednesday, March 25, 2009

Lasagna Casserole

I know what it's like to be needing some extra help from family or friends, for instance, when I have a new baby, or am sick or hurt. Friends, neighbors, and family always offer extra help by bringing dinner to your family. It's something I love to be able to do for those in need as well.
Today's recipe is one of my go-to recipes for when a family needs a meal. It's quick, easy, cheap, and everyone likes it.

Here's what you'll need:

1 lb. ground beef seasoned with salt, pepper, garlic powder, and chopped, dried onion flakes
1 (12 oz.) pkg. pasta (corkscrew or small shells or 3 different shaped pastas work really well and kids think they're fun to eat)
2 (26.5 oz.) containers spaghetti sauce
1 (16 oz.) carton cottage cheese
1 egg, slightly beaten
2 C. shredded Mozzarella cheese
1 C. sliced, fresh mushrooms (opt.)

Cook pasta according to instructions. Cook beef, with seasonings and mushrooms (if desired), in a large skillet over medium heat until cooked through. Drain pasta. In a large bowl, combine the spaghetti sauce, cottage cheese, egg, and half of the cheese. Add the cooked hamburger and pasta. Pour into a greased 9x13 inch baking pan. Bake at 350 degrees for 25 minutes. Sprinkle with remaining cheese and bake another 5 minutes.

Wednesday, March 18, 2009

Cinnamon Cream Syrup

One weekend, we decided to make breakfast - pancakes, I think. After I mixed up the batter and handed it over to my hubby to cook, I went to pull out the syrup. As I rumaged around the cupboard, I remembered that we had finished it off the last time I made breakfast. I didn't have time to run to the store and get some more, so I jumped online and started searching for recipes.

My kids love maple syrup but I soon found that I didn't have any maple extract either. So when I came across this recipe from allrecipes.com, I thought I'd give it a try since I had all of the ingredients. Boy, am I glad I did! This is our new favorite syrup and we all agree that it is WAY better than maple!! So, as promised, here is today's yummy recipe that you MUST try!

Here's what you'll need:

1 C. sugar
1/2 C. light corn syrup
1/4 C. water
3/4 tsp. cinnammon
1 (5 oz) can evaporated milk

In a saucepan, combine first four ingredients. Bring to a boil over medium heat; boil and stir for 2 minutes. Cool for 5 minutes. Stir in evaporated milk. Serve over pancakes, waffles, or french toast. Our favorite is to serve it with french toast because it makes it even more cinnammonny (is that a word?)! But we love it with any of those options!! It is so good; try it and let me know what you think!

Tuesday, March 17, 2009

Fudge Cookies

My poor kids! I completely forgot that today was St. Patrick's Day and sent them each to school and Pre-school NOT dressed in a speck of green! I only realized what today was by this afternoon. I felt so bad that hadn't done all I could to prevent them from getting pinched. So I tried to make it up to them with a fun St. Patrick's Day treat.

One of my favorite things my mom made growing up were Fudge Mounds. These are light, tender, and fluffy cake-like cookies that are very similar to whoopies. She always topped them with mint flavored frosting, tinted green. I LOVED them!!!

Since I've moved to a much higher elevation, I've tried to make them and have them turn out as I remember, but I've had no luck. Instead, the altitude here makes mine turn out to be fudge cookies, which is not all that bad, by any means! In fact this is one of my good friends' favorite cookies now, and I thought this would be the perfect thing to make up for my poor parenting skills!
Here's what you'll need:
1 C. brown sugar, packed
1/3 C. shortening
1 tsp. vanilla
1 egg
2/3 C. milk
2 C. flour
3/4 tsp. baking soda
3/4 tsp. salt
1/3 C. cocoa

Combine the first five ingredients, then add the last four. Beat until well combined. Drop onto an ungreased baking sheet and bake at 375 degrees for 10-12 minutes. I found that at 10 minutes, the cookies are really fudgy. At 11 minutes, they are in between fudgy and cakey. And at 12 minutes, they are more cakey, but have a thicker, more structured form. So it depends on how you'd like them as to how long you should bake them. For me, 11 minutes is perfect! Cool on the baking sheets for 5-8 minutes, then transfer to a cooling rack to cool completely.
This is after 10 minutes of baking. They are nice and puffy when you take them out of the oven, but then deflate as they cool, as seen below.
Once cooled, frost with peppermint flavored buttercream frosting, tinted green. This time, I made yummy fudge cookie sandwiches (like whoopie pies) that were super delish! At Christmas time or Valentine's Day, I like to tint the frosting red and frost the tops of the cookies, leaving them open faced, and sprinkle with crushed candy canes. HEAVEN!!!!

Though these cookies aren't too bad, what makes them amazing is eating them with frosting! I wouldn't eat them without!! Mmmmmmmm!!!!!!

Weekend Waffles

As I have mentioned many times before, my little family LOVES breakfast foods. And just like my pancakes, I have two recipes that I use - one with buttermilk (which is better) and another with out (a very good second option). So today I'm giving you my favorite non-buttermilk waffle recipe. I love how this recipe turns out so beautifully with a lightly crisp outside and a tender, delicious inside. And one of the reasons why I like it so much is because I don't separate and beat the egg whites and they still turn out fabulously!!

Here's what you'll need:

1 3/4 C. flour
1 T. baking powder
1/4 tsp. salt
2 eggs
1 3/4 C. milk
1/2 C. oil

In a mixing bowl, combine the flour, baking powder, and salt; set aside. In a large mixing bowl, beat the eggs for five minutes (this is very similar to my pancake recipe and will give you a more tender finished product; if you don't beat the eggs this long, you'll get more of a chewy, rubbery texture). Add the milk and oil and beat until well combined. Then add the dry ingredients and stir or beat on low just until combined. It's alright to still have some lumps. Pour batter into a greased, heated waffle iron and cook until golden.

When I make these, I always double the batch, first of all, and then I cook a few and have them sitting stacked on a plate so that everyone can get started eating while we are cooking more as we eat. I cook them right at the table so that they go straight from the waffle iron to someone's plate. That way we get fresh, perfect, delicious waffles as soon as they are ready and we are ready for them!

You can serve these with maple syrup, fruit syrup, fresh berries, or my special Cinnamon Cream Syrup, which I'll be posting tomorrow. And I'll tell you what, that's something to look forward to!!!


P.S. One more quick note! When my in-laws serve waffles, they like to break an egg or two into the greased and heated waffle iron, salt and pepper them, shut it, and let it cook until the eggs are done. My kids think it's the most fun way to eat eggs. They look just like waffles!

Friday, February 27, 2009

Raspberry White Chocolate Chip Cookies

I just have to tell you about this wonderful store that I've been shopping at for almost two years now. It's called The Prepared Pantry. They have a wonderful assortment of things to buy - pots and pans, gadgets, jams, syrups, gormet food, mixes of all kinds like cookies, breads, pancakes, muffins, and on and on and on! I love it!! Everything that I've tried from them has been wonderful so I buy things for my family members from the Prepared Pantry and they have loved them.
One of the best parts about their company is that they package their mixes in mylar bags so that they will last a long time and will still be good if there's a flood, for instance. Anyway, you'll have to check out their website at http://www.preparedpantry.com/ and just browse their wide variety of things that they sell. You can also sign up for their emails and cooking classes, which I do and find very informative!
This past Christmas, I gave all of my family cookie mixes. There is such a fun and unique variety I think I bought about 10 different kinds and then several of their most popular cookie, which is what I want to talk about today. Their best selling cookie is their Raspberry White Chocolate Chip Cookie. I had heard so many good things about them that I decided to try them out myself.
Now it is very rare that I will make cookies, or many other things, from a mix. But one thing I liked about this mix was that they actually are like homemade, from scratch, cookies. And they are very simple to make. You just follow the instructions on the bag and you have freshly baked cookies in no time! IDEAL FOR MAKING WITH KIDS!!!!
Here's what I did...

Super easy and fast! Love that!! And if I remember right, all you have to add are the eggs and butter. Now about the flavor and texture - not what I had expected. There is oatmeal in the mix that give these cookies a nice and slightly chewy texture to it. I don't normal like oatmeal in my cookies (unless they are oatmeal cookies), but it worked very well and I really liked it.

But it was the flavor that got me the most. These cookies are so different, different from any cookie I've ever tried, that I kept going back for more to enjoy the combination of white chocolate and raspberry. The comment that I got from everyone that I shared them with was, "Wow, what is that?!" Give them a try if you want something a little different and unexpected!

Thursday, February 26, 2009

Pioneer Eggs

I've eaten this breakfast ever since I was a little girl and like to think it came from my pioneer ancestors as they crossed the plains. It's a fun and different way to eat eggs and toast, and super easy to make!

Here's what you'll need:

Bread
Butter or margarine
Eggs
Salt
Pepper
Syrup (opt.)

Butter both sides of your bread slices and use something circular to cut a round hole in the center of each slice. You can use a biscuit cutter or a cup, like I did. You'll just want to make sure that it's a big hole that will take up most of the bread slice.


Place buttered bread slices and circles on a heated frying pan or griddle. Break an egg in the hole of each bread slice and salt and pepper the eggs only.

Cook until golden then flip over to finish cooking.


You can eat these plain or with a little syrup drizzled over them.

A yummy way to eat toast and eggs!

Tuesday, February 24, 2009

Meatball Sub Sandwiches

Do any of you ever get tempted by watching TV commercials around dinner time? I don't know if it's because I'm pregnant or not, but, boy howdy, almost any commercial I see that has food in it makes me start to think of when I'll be making it!

The commercial that has gotten to me the most is that Subway one with the Meatball sub sandwich. I'm not quite sure why that commercial over so many others; I think maybe it has to do with me thinking, "Why would I go and pay someone to make that for me when I can do just as good of a job at home?"

Just looking at it on TV, it looks so simple to make, so I decided to give it a try. I found that, yep, it is that simple!!

Here's what you'll need:

Basic Meatballs:
2 lbs. ground beef
2 eggs
1/2 tsp. garlic powder
1 tsp. salt
1/4 tsp. pepper
1 C. dry bread crumbs
4 T. dried minced onion
1/4 C. Worcestershire sauce

Combine all ingredients, except the ground beef, and mix well.

Add the ground beef and mix well again.

Using a 1/4 cup of meat, form into a large ball and place on a foil-lined rimmed baking sheet.

Or if you want to use this recipe for regular meatballs in any other recipe, use a Tablespoon of meat and form into a small ball. Bake at 350 degrees for 25-30 minutes for the large meatballs or about 15-20 minutes for the small meatballs, or until cooked through.

Now for the rest of the sub sandwich directions, simmer a pan of spaghetti or marinara sauce and place cooked meatballs in pan and cover with sauce. Cut open Bolillo rolls or any other sub sandwich bread rolls, butter each side and place sauce-covered meatballs (about three large meatballs per sandwich) in rolls. Sprinkle with Mozzarella cheese and broil until cheese melts and bread is toasty. You can spread more sauce over your meatballs before you serve them if you like them saucy, like I do.Take that, Subway! Super easy, really yummy, and it'll save you some money too!!

Thursday, February 12, 2009

Heart-Shaped Brownie Bites

Editor's note: If you like these Brownie Bites, check out my improvements HERE!

I remembered at about midnight last night that my daughter needed a Valentine present to give to her preschool teacher in the morning. So early this morning, I started making this brownie recipe that my sister-in-law, Valerie, gave me years ago. I normally make these brownies to feed a large crowd. They are baked in a jellyroll pan, so not too thick, and are nice and moist and chewy - perfect for cutting into shapes! Since it's for Valentine's Day, we obviously went with hearts. They turned out so cute! I was so excited and her teacher really enjoyed them.

One big reason why I love this brownie recipe is because you just dump all of your ingredients together, mix it up, scrape it into the pan, and bake it. It just doesn't get much easier than that when it comes to making brownies from scratch. Sometimes I top the baked brownies with powdered sugar, but the best way to eat these is with marshmallows baked into a gooey mess then topped with fudge frosting! You could add chopped almonds to make them Rocky Road Brownies, but since I don't like nuts, I don't. But for today's project, marshmallows and frosting just weren't going to work. Try this out for your chocolate lovers for Valentine's Day!

Here's what you'll need:
3 C. sugar
6 eggs
3 1/2 C. flour
3 1/2 cubes butter, softened or melted
1 C. cocoa powder
1/2 C. corn syrup
1 T. vanilla
Dump everything together and mix well.
Seriously, you just dump everything together!
Scrape into a greased and floured 15x18 inch jellyroll pan. Spread to fill pan evenly. Bake at 350 degrees for 25-30 minutes. When they have cooled you can use a little heart-shaped cookie cutter to cut up your brownies.You can also cover with mini marshmallows and bake another 3 minutes or just until marshmallows puff. Allow to cool, then frost with your favorite fudge frosting. Or you can dust your plain brownies with powdered sugar.

How cute are these?!

Wednesday, February 11, 2009

Creamy Noodle Casserole

I made this dish last week using leftover ham. When we sat down to eat, I didn't hear any objections at all! My daughter ate her serving in no time at all and then asked for more, and then more. When she finally had her fill, she said, "Mom, thank you for making that dinner; it was so good!" Now how often do you hear that from your children? For me, it's not very often. So when I do, I know that recipe is a keeper!

It's also nice that this is a one-pot-dinner. You just make this dish and you're set for dinner! And it comes together in about 15 minutes. Perfect for a busy weeknight.

Here's what you'll need:

1 (12 oz) pkg. egg noodles
1 (16 oz) pkg. frozen broccoli cuts
3 C. cubed or shredded ham
1 C. shredded mozzarella cheese
1 C. shredded Parmesan cheese
1/3 C. butter or margarine
1/2 C. half-and-half cream
1/4 tsp. garlic powder
1/4 tsp. salt
1/4 tsp. pepper

In a large pot, cook noodles in salted boiling water for 5 minutes. Add the broccoli and ham; cook another 3-5 minutes. Drain; return to pot. Add remaining ingredients. Cook over low heat, stirring constantly, until butter is melted and mixture is heated through.

Quick, easy, delicious, and your kids just might thank you for making this too!

Related Posts Plugin for WordPress, Blogger...